Category Archives: Arts and Crafts

Becoming an Artist: The Dot by Peter Reynolds

At our last library trip, we happened across the cutest story! 

The Dot, by Peter Reynolds, is a story about a little girl who thinks she can’t draw until her teacher proves her wrong.  She’s inspired to keep trying and eventually inspires others too. 

This was the perfect book for J.  He is such a perfectionist that he often chooses NOT to do something if he thinks that he won’t be able to do it “right”.  This book fulfilled its purpose and inspired my little guy to become an artist!

After reading the book, we decided to create our own art museum of dots.  I pulled out markers, crayons, map pencils, water colors and cardstock.  J was thrilled.  He was confident.  He became an artist and loved it!  He even wanted to sign his work, just like the little girl in the story.

After all his pieces dried, we hung them in his room.  We now have an in-house art museum featuring my favorite artist.

Healthy Food Placemat

I found this Fun Food Guide and thought it would work great as encouragement towards healthy eating since J loves filling in charts and graphs and has this innate need to “get all the spots”.  So that we didn’t have to keep printing off a new chart, we made it into a reusable placemat.

PREP: I used google images to printout out a ton of pictures of healthy foods from all the food groups.  I also attempted a dot-to-dot title using some of the different foods. I had everything precut. 

ACTIVITY: He first glued the title in the center of the paper.  Then we spread out all the pictures.  I called out a food for J to find and glue onto the construction paper.  This made the craft a game and also helped me find out which foods he did/didn’t know. 

On the other side, he glued down the chart and descriptions of each food group found HERE.  He also glued some fruit pictures I found to color.

When all the gluing was finished, I covered the construction paper in clear contact paper. This way I can wipe it clean easily and he can use dry erase markers to write on it.

FUN WAYS TO USE THE PLACEMAT:

  • Connect the dots to write the word “Healthy”
  • Circle all the pictures of a certain food group
  • Circle foods that start with a certain letter
  • Circle foods of a certain color
  • Check off foods as you try them
  • Fill in the chart as you eat each meal
  • Color the fruit

We don’t fill the chart in every single day.  I usually bring out this placemat when J’s starting to get picky.  Since it keeps its novelty, it really helps him to finish his plate so he can color in all the shapes for that particular day.

Age: we started this around 33 months


Flower Mobile (or possibly placemat)

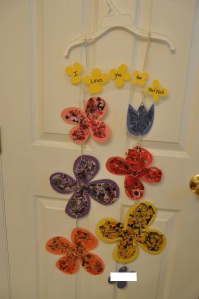
J made a flower mobile for his grandma as a get well soon gift.  It would be a great gift for any girl on any occasion really. I think it turned out really cute and J had a lot of fun creating it.  He stuck with it until it was all finished!

What you need:  Construction paper, contact paper, scissors, flower magazine, marker; you will also need a  hangar, a hole punch, and string if you want to create the mobile

Prep Work:  I cut out the borders for each flower, using different colored construction paper.  I also cut out two equal sizes of clear contact paper, taping one to the work-table (sticky side up).  The other piece of contact paper is saved to place on top after the flowers are completed.

During the activity:  J placed the flower-borders onto the contact paper though he needed some help with the larger pieces since they can get tangled easily.  He then searched through a flower magazine to find flowers to fill each border, matching the colors accordingly.  I just had him tear the pictures out of the magazine rather than using scissors.  We then worked together to tear the pictures into small pieces that he could stick inside the corresponding colored flower.  After all of the flowers were filled, we added a message for grandma and J signed one of the flowers himself.  I then placed the second sheet of contact paper on top.  If we were creating a placemat, the activity would basically be done. Just trim the edges of the contact paper to make a more finished look.  (My intention was to create a placemat, but I did not plan well.  The flowers were so huge that the placemat covered half the table! So I improvised and decided this was going to become a mobile instead.)

For the mobile:  I cut apart each flower and punched a hole into the top and bottom.  I also cut small pieces of string to attach the flowers together.  J helped thread the string through the holes and I tied the knots.  We then tied it onto a hangar. 

Age attempted: 3 years

Dot Marker Phonetics

I had the dot markers out this week.  I remember thinking these markers were so expensive and wondering if they were worth it.  Well, in our house they’ve gotten lots of play time and J still loves them.  They were some of the first markers that I let him use actually (see J’s autumn tree here).   

I made up this quick color sheet for J to use with the markers.  He had to match the sound of each letter (or object) to it’s corresponding color.  So he painted a green guitar, a purple panda, etc.  I had him match the sounds and make a guess first, then he could check his answer by looking at the color names written on the marker to see if he was correct.  He actually really enjoyed this activity and thought he was basically just coloring.  He had no clue he was learning too 🙂 

Here’s the before (the pictures are just clip art):

Here’s the after:

 Age attempted: 34 months


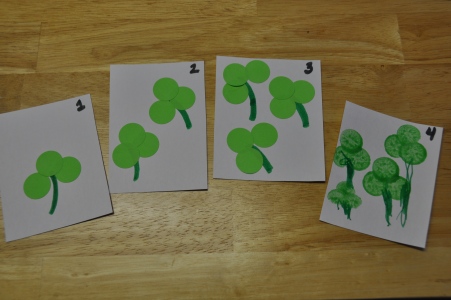
Counting Clovers

This activity was done with no prep (it seems most of our activities this month are no prep since I’m crazy busy getting ready for a baby). 

I cut out the squares while J counted how many we had ( cut out 9 of them).  We then numbered them together (and he decided to make a number line with them).  I explained to J how to make clovers using a green marker and green circle stickers.  I used directional words like left, right and above (or sometimes “on top”) when describing where the stickers should be placed.  I also used this activity to practice ordinal numbers (first, second, third). 

At first I drew the stem myself and he added the stickers.  He counted and told me when I had made enough stems to match the number written on each square.   Then he made the stems himself too.  I actually didn’t have a lot of stickers left so he also used a green dot marker to create some clovers.

Age attempted: 35 months

Sticker Igloo

This igloo craft was a lot of fun to make and I think it turned out really cute too!


What you need:  blank label stickers (I actually used mailing labels and cut them down to size), construction paper, scissors, glue, black marker

What you do:  Have your little one build a wall on the construction paper, using the labels.  Once they’re finished, turn the paper over and draw a semi-circle on the back.  Either have them cut out along the line, or you do the cutting for them.  To create the door, cut out a second semi-circle and have them color a black door, then glue on top of the larger piece.  After gluing his igloo together, he added some snow to his picture. 

This was honestly supposed to go with a winter unit I was going to do with J… but 3rd trimester exhaustion has set in so the unit didn’t happen.  I ended up cutting out the upper and lower case letter I, letting him fill those in with “ice blocks” and decided reinforcement learning was enough this day!  J was quite proud of his final work of art. 

This idea is from the Frugal Family Fun Blog.

Dump Truck Valentine Card

J made these Valentines cards for his cousins. 

What you need:  Unopened box of candy and a few extra pieces of the candy, construction paper, cardstock, car stickers, marker, and glue

 Prep:  I precut all the pieces of the truck for him to glue onto the cardstock and already had the “Happy Valentine’s Day” message on the cardstock. 

J  put the shapes together to create the truck and then added the box of candy at the end.  

The front of the card has a little road with some foam car stickers.  I thought it turned out pretty cute

This is from Busy Bee Craft Kids.com .  Of course, I didn’t plan for the candy box to be glued on at a tilt (in effect, dumping its cargo).  Oops!

Homemade Gift: Magnetic Foam Frames

J made these to give to some of our family as a Christmas gift.  This was a homemade gift he could feel completely responsible for and KNOW that he created it himself. 

Materials: Foam, Magnetic plastic frame (from dollar store), Stickers, Buttons, Googly Eyes, Post-It Notes, Glue

Prep: I cut out the foam frames and gathered materials for J to choose from to create his gifts. **You can also buy prepackaged foam frame crafts and just add the fridge photo magnet on the back yourself.**

We had 4 frames to complete as gifts, so J chose the color for each recipient and the materials to decorate it with.  This also meant that one set of materials weren’t used (he didn’t choose the googly eyes this time).  I helped make sure he was spelling his name correctly on frames (all except one, which he declared was for Grandpa and would hold a picture of Grandma since he loved her so much… hence no need for J’s name on the frame!).  The only other involvement I had in the process was some encouragement to practice creating a pattern with the buttons.  He’s all about patterns right now though so not much need to push with that!

He also didn’t complete all the frames at one time.  After he finished a couple and chose the materials for the others, I packed some up for him to complete on the plane.  This was a great activity to do on a plane, little packing, light-weight and kept him focused.

I was so surprised to see how symmetrical he designed the frame with bubble stickers, maybe he’s finally getting out of that stage where he wants to stack stickers on top of each other! 

After everything had dried, I glued a magnetic frame (bought at a dollar store) onto the back so the frames could be placed on a fridge and photos could be traded out easily. **Be sure you don’t glue the frame closed so that photos can be changed out later.**

Age attempted: 33 months

Butterfly Card

J made two butterfly birthday cards, one for his grandmother and one for his cousin who both love butterflies.  I remembered an adorable card a college roommate made me way back when and decided we would try a toddler version of the same. 

I also found these instructions from Enchanted Learning and modeled ours close to that.  Basically I cut out two butterfly shapes and then trimmed one about an inch smaller than the other (saving the trimming for our 2nd butterfly).  The other supplies we used were googly eyes, glue, a stamp pad, hole puch, and pipe cleaners.

 J could do most of the rest really.  Though this was J’s first attempt with a hole punch and it was honestly too difficult.  Eventually he just pushed the puncher down over the paper and thought he was helping as I gripped the handles and did the work.  He found the hole puncher very intriguing!

His favorite part was the fingerprints.  I should’ve known red ink last a LONG time on fingers.  It’s supposed to be washable… and I guess it technically was, but it tooks LOTS of washing. 

I forgot to show the final result when we had the birthday message written on the cards too.  I thought they turned out cute.  They would work as Valentines, Mother’s Day, or birthday cards or even as decor for springtime.  I think it would be pretty to create a few different designs and hang them all together on a mobile.

Age attempted: 33 months

Our Most Used Supplies

I was hoping to post this before Christmas as a helpful guide for shopping, but obviously that didn’t happen.  So instead I’ll present these as great supplies that can help you make it through the winter.   These are the activity supplies that get the most use in our home.  I think they would be worth the money in any toddler home. 

  • Play-doh (cookie cutters are a nice addition, but not necessary)
  • Sidewalk Chalk
  • Clear Contact Paper
  • Pipe Cleaners
  • Pompom Balls
  • Dot Markers
  • Package of colorful foam paper
  • Cardstock
  • Painter’s Tape
  • Food Coloring

The Usual Suspects (There’s a reason these are considered common craft supplies!)

  • Crayons
  • Stickers
  • Glue/Glue Sticks
  • Construction Paper
  • Markers
  • Paintbrushes
  •  

Around the House

  • Empty containers with lids
  • Cotton balls
  • Q-tips
  • TP and Papertowel rolls
  • Magnets (save the ones you get in the mail)
  • Ice
  • Measuring spoons/cups
  • Cardboard (from old boxes)

Really these items alone would allow you to create almost anything.  Each item in the list will also last you a long time.  In most cases, we are still using the packages I bought when J was around 14 months (with the only exception being stickers).  I basically roamed the craft aisles one day and fortunately came out with almost all winners.  I’m not normally that successful with my shopping!  The one thing I bought and still haven’t used much is the colorful felt.  I imagine some moms would use this up in no time, but as of now I’m still working on how to put it to good use.  I’m open to suggestions on that one!