Category Archives: Science

Shaving Cream Landforms and more

I’m attempting to record all our favorite activities that I just never got around to writing about.  This is one of the activities we did as part of our focus on Creation.  I was hoping to do a whole series of posts on our Creation activities.  But since it’s been almost 2 years and I still haven’t gotten around to the task, it’s pretty safe to say it’s not gonna happen.  Our landform activities were simply too fun not to share though!

We were talking about how God created the land and focused awhile on the different types of land we see. I was using the Creation story to fulfill our “science” activities.

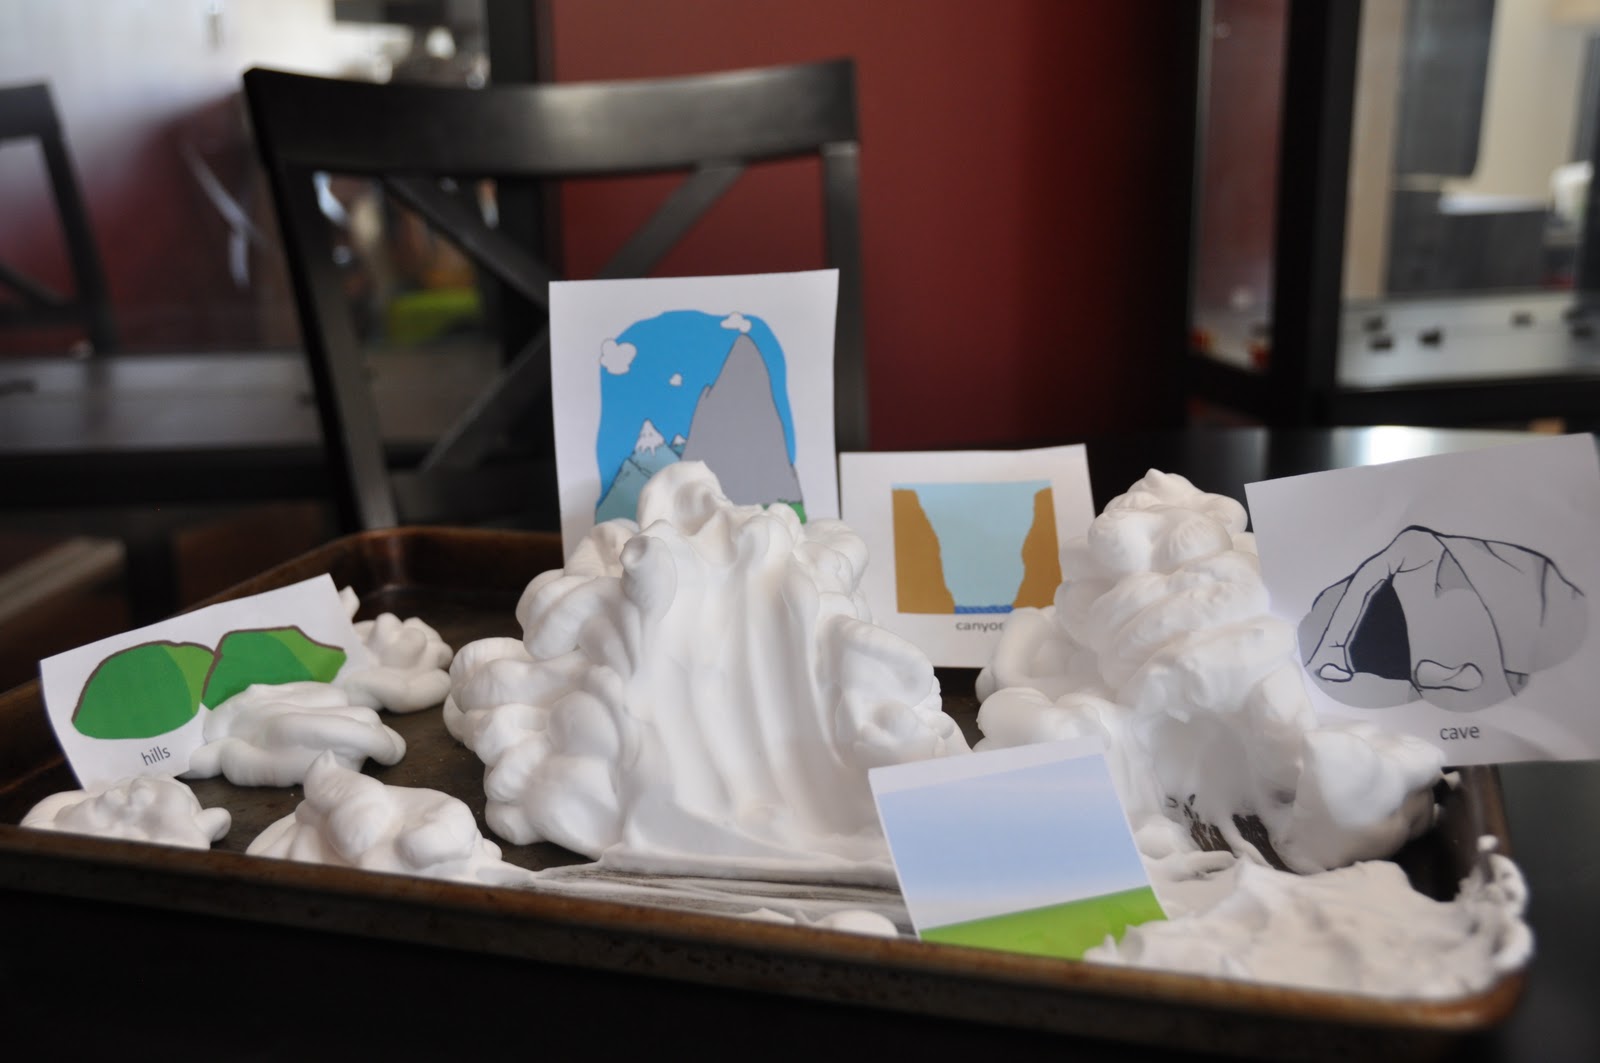
I chose 5 or 6 landforms (it’s been awhile so I can’t remember exactly) to focus on and printed one photograph and one illustration of each. I found all the pictures online. It would probably be a good idea to laminate these. Our pictures certainly got messy.

Matching– First I had J match the illustration to the corresponding landform photo.  This is a great way to practice matching for any category, especially if your child has no trouble matching 2 pictures that are the same.

Here he is showing off our mountains
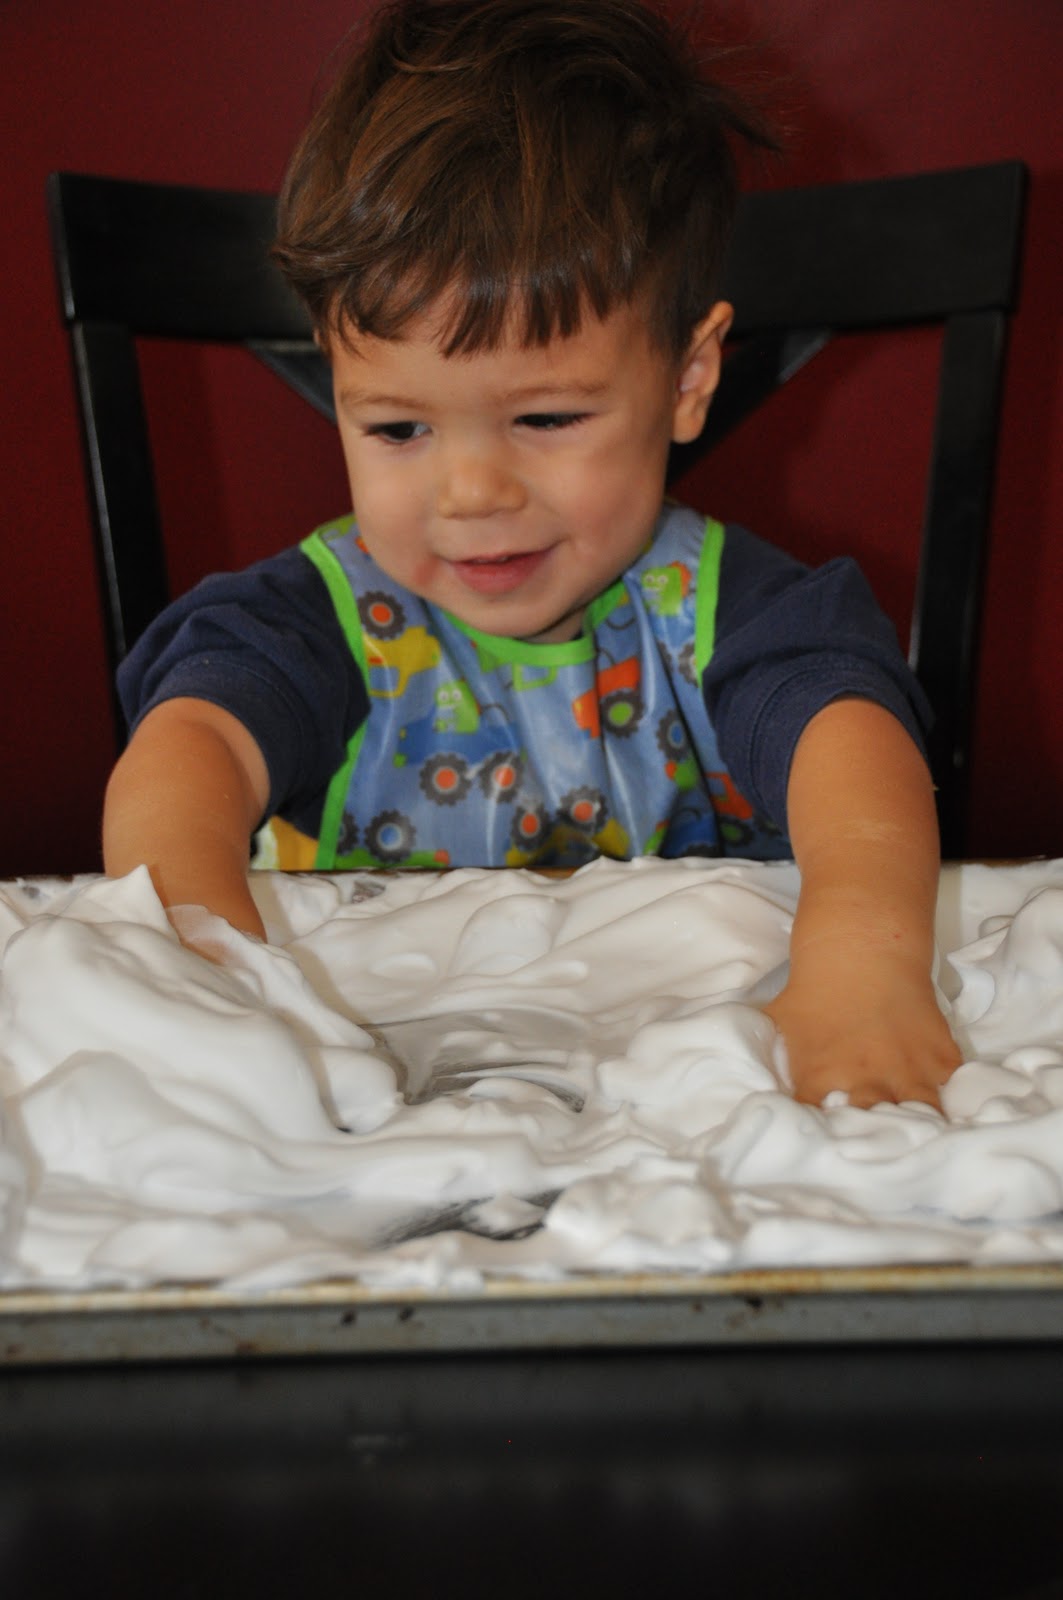
Shaving Cream fun I brought out the shaving cream and we created our own examples of the landforms. Warning – you will use A LOT of shaving cream if you truly want to make quality landforms. 🙂 I bought a can at the dollar store. J was 2 years old when we did this activity and did need some help making a few of the landforms. TIP: it’s a good idea to start with the mountains!

After all the landforms were made, J “labelled” each with the correct picture.

The photo doesn’t do our foam world justice 🙂
Of course he had tons of fun digging in the “dirt” too!
 We threw in some bath foam fish, nothing to do with landforms but he liked it.
Landform Obstacle Course – For our last landform activity, I set up an obstacle course in the living room.  Pillows on the floor were islands that he had to hop on. Pillows stacked on a chair was our mountain. A blanket thrown over the table created our cave. I pushed the couch up to the chair to create a “canyon” in between.  We talked about each landform in the obstacle course and went on a “bear hunt” through the obstacle course.  It’s so much more fun moms if you join in the climbing and hopping! And finally we played a game where I called out a landform and he had to climb, crawl or hop to it.  Lots of fun!

Let’s Practice Brushing our Teeth

Before J’s first trip to the dentist, we did a quick unit on teeth.  We talked about why to brush/floss, how to, especially bad foods, etc.  Here’s an activiity we did that turned out pretty fun and useful.

You’ll Need: At least one teeth photo (laminated), toothbrush, water, various foods (the stickyer the better!)

I laminated a few teeth photos (found on GoogleImages).  Then J
fed the photos some good and not so good foods.  We took note of how each food effected the teeth (ex, icing got stuck all over the teeth).  Of course I let him try some of the foods too, as evidence shows in the photo! It did give him some real experience with how the foods felt in his mouth and helped him better describe the feeling.
Then we practiced brushing the gunk away. It was a good way to get him to see the purpose of brushing.  We talked about where to brush (front, back, top, sides,…) and how to brush and practiced the strokes. After our fake teeth were clean, we headed upstairs to brush some real teeth.
We’ll probably do more practicing like this as he gets older. This was a fun way to teach and practice a very important part of life.

We started a new tooth brushing song during this activity. I got tired of our normal brushing song (This is the way we brush our teeth… like the mulberry song) and decided we needed a change.  J thinks our new brushing song is fun. I sing to the tune of “I’m Gonna Wash that Man Right Outta My Hair”… and just change the words to… I’m gonna brush that cheese right off of my teeth, I’m gonna brush those blueberries right off those back teeth… filling in whatever he just ate and wherever I’m brushing in his mouth. He likes to remind me all the different foods I have to brush off.  A year later and he still loves to sing this song!

Age attempted: 2.5 years

Healthy Food Placemat

I found this Fun Food Guide and thought it would work great as encouragement towards healthy eating since J loves filling in charts and graphs and has this innate need to “get all the spots”.  So that we didn’t have to keep printing off a new chart, we made it into a reusable placemat.

PREP: I used google images to printout out a ton of pictures of healthy foods from all the food groups.  I also attempted a dot-to-dot title using some of the different foods. I had everything precut. 

ACTIVITY: He first glued the title in the center of the paper.  Then we spread out all the pictures.  I called out a food for J to find and glue onto the construction paper.  This made the craft a game and also helped me find out which foods he did/didn’t know. 

On the other side, he glued down the chart and descriptions of each food group found HERE.  He also glued some fruit pictures I found to color.

When all the gluing was finished, I covered the construction paper in clear contact paper. This way I can wipe it clean easily and he can use dry erase markers to write on it.

FUN WAYS TO USE THE PLACEMAT:

  • Connect the dots to write the word “Healthy”
  • Circle all the pictures of a certain food group
  • Circle foods that start with a certain letter
  • Circle foods of a certain color
  • Check off foods as you try them
  • Fill in the chart as you eat each meal
  • Color the fruit

We don’t fill the chart in every single day.  I usually bring out this placemat when J’s starting to get picky.  Since it keeps its novelty, it really helps him to finish his plate so he can color in all the shapes for that particular day.

Age: we started this around 33 months


Pick Your Own Fruit and Vegetables

This is the season to pick your own fruit!  We’ve done this twice now.  Last year we picked apples when J was 2.5 years.  This month we picked strawberries.  This is such a great activity.  For someone like me who can’t manage to grow anything, this is the only way he’ll probably ever see for himself where our food comes from (other than the grocery story!)

He’d much rather sleep in his crib.


Of course he loved enjoying the reward of his hard work too! 

I’ve found this website helpful in searching for farms where you can pick your own fruit/vegetables.  They have maps of each state so you can find farms for your specific county.  For those like me who are completely ignorant about which foods are harvested in which season, they also have harvest dates for your region.

Grow Something!

This is something we did to celebrate J’s birthday last year.  He got to pick out some flowers at the store and then had some fun digging holes in the dirt, planting, filling, watering, getting dirty,… 

He planted flowers both in pots and in our front flower bed.  The potted plants didn’t do so well (I do NOT have a green thumb and had no clue what I was doing, apparently we planted way to many in the tiny pots!).  The flowers he planted in the garden did great!  All season long he could point out the flowers that he planted.  We will definitely do this again this year. 

Let your little ones help you this year as you refill your flower beds!

Age attempted: 24 months

Color Mixing with Ice

When I was pulling up the old activities using ice, I realized that I never posted this last summer (I took a LONG break back then!).  These photos are from this past summer.   This is a great outdoor activity but a few simple adaptations can  easily bring this activity inside during the winter months and actually works well with a winter theme. 

(I honestly just copied this post from the one I wrote for our private family blog last summer.  I made very few adjustments – in italics – which is why it sounds like I’m writing from the perspective of summer…. I was!)

J’s homemade water “table” is still one of his favorite activities of the summer.  A few days ago we made yellow and blue ice cubes together.  This is an activity all in itself and a great way to teach the process of freezing. Let them fill the tray using a scooper or a medicine dropper to include some fine motor skill practice!  He’s been patiently waiting to play with them since. 

He first separated the ice cubes into bowls by color and chose to make blue water first.  I filled the tray with a small amount of water (just make sure the tray is white/clear so you can easily see the water change colors as the ice melts). He really enjoys scooping and stirring the ice cubes, letting them melt in his hands,… **Use this step to utilize motor skill practice with tongs or different size (and length) scoopers or spoons.**  I’m surprised at how long a little ice can entertain!  When he moved onto the yellow ice cubes I asked him which color the water (currently blue) would become and he of course guessed yellow.  I told him it was going to be a surprise that he’d have to wait and see.  He wasn’t convinced the water was actually green until the very end when there was no denying it.  He was sure it should be either blue or yellow! 

(Sorry, I kinda cut off his face!)


We then filled the ice cube trays with green water to play with in the future.  This activity is free, entertains a good while and recycles itself too!

Homemade Game: What’s In the Stocking?

We played this fun and simple game and ever since J has been bringing me the stocking and asking to play again. 

How to Play:  Gather a group of items from around the house with different shapes, textures, and purpose.  Older children could handle more suddle differences in the objects.  Keep them hidden from sight.  Place one item in a Christmas stocking and have your little one feel inside and make a guess at what the item is.  I encouraged J to describe the item as he felt it to help him make an educated guess. 

This is so simple, no reason not to try it!  With older kids you could even make this a game you play on Christmas morning.  Younger ones might have a hard time with guessing items they’ve haven’t seen yet. 

This is great for exploring textures, using simple deductive reasoning, and practicing descriptive words.

Last night we reversed rolls.  He hid things inside and brought me the stocking to make a guess.  It actually worked great while I was cooking.  It kept him well occupied.  Every few minutes I heard, “Mommy no peeking! Just look!”  (What he meant was, “no peeking, just feel”).  Of course it took him awhile to realize he should let me make a guess before he told me what it was.  He was just so excited!

Age attempted: 31 months (certainly can be done earlier!)

**I’m even categorizing this as a good travel activity since a similar version could easily be done in the car or on a plane.  Just use a bag or the seat-back pocket on the plane.

More Sticker Sorting for Travel (or anytime)

This is an activity we’ve done on an airplane that works really well.  

Prep: I printed out pictures of a road, the water and the sky. You could definitely just draw these as part of the activity on the plane.  I then cut out stickers of things that were found in each location.  I placed the stickers in a zip-up pencil bag.  J pulled out one sticker at a time and decided which setting it should be placed in.  This worked really well and kept him occupied for awhile (he had a lot of stickers to place). 

We’ve also done a similar activity in a hotel room.  I drew a train track, road and lake on some paper and he found stickers to place on each.  He was then quite content to drive his cars around the tiny road for quite awhile!

Finally we’ve done something similar at a restaurant.  I have a random assortment of items in my purse at any given moment.  In this case stickers and index cards.  We drew a setting on each one and he sorted the stickers. 

These type of activities would also work well for long doctor appointments and car rides

We do lots of sticker sorting around here since it is a great way for J to practice categories and also helps him with fine motor skills (getting the stickers off really works those pincher muscles).  It also requires little prep on my part and the only supplies necessary are paper and stickers! 

Here are a couple other examples I’ve posted on in the past:

Sorting Colors with Stickers

Counting with Stickers  

We’ve also done shapes, seasons, letters and animal homes.  The possibilities are limited only by your sticker collection.

My First Recipe Cards

I thought I’d share something that I’m giving my 4 year old nephew for his birthday busy box.  He loves to cook, so I thought we’d start helping him work through simple (VERY simple) recipes on his own.  Many of the recipes involve no actual cooking, focusing on just the basic skills of working in a kitchen (ingredients, measurements, and following steps). They are recipes that preschoolers would enjoy eating as much as they enjoy “cooking”.  I included pictures to go along with most steps to help a non-reader out.

I’m going to try to do one of the easier ones with J pretty soon. I already have some modifications in mind to make it even easier for younger ones, but I do think these will work well in their current state.

Here’s the entire set of cards. My First Recipe Cards

To prepare them, I printed them on cardstock.  I then cut along the horizontal line and folded along the vertical one to create a front and back for each card.  I then hole punched along the left side of the cards (the open side) and used two small binder rings to combine the cards together. 

Add some measuring spoons, cups, mixing spoons, a hat and apron and laminate these great toddler/preschool food charts  as a placemat and you have an easy gift for birthday or Christmas.  If their interest continues, you could easily add a few recipes to their collection each year. 

If you try it out, I’d love to hear how it goes!

Leaf Sorting Pictures

This was an activity J did sometime during the summer when we were talking about how God created the plants.  It was simple yet effective and included very little prep work! My favorite 🙂

During a morning walk, we gathered a group of leaves from a few different trees (or bushes; J was adamant we chose a certain leaf from a bush!).  When we got home we examined the different kinds of leaves we chose.  How many points do they have?  Shape? Color?  Smooth or rough? 

Sorry for the dark photo. My normal camera was packed away in a boz so I used my iphone.

Then I mixed all the leaves together, cut out three tree trunks (we used 3 different types of leaves) and J sorted the leaves to replicate the three different trees. 

He did this activity on contact paper since I wasn’t sure if glue would hold the leaves in place quickly enough. I imagined a mess honestly and didn’t have time for one this day. 🙂

Age attempted: between 2 and 2.5 years