Category Archives: Patterns

Ice Cream and Popsicle Patterns

I came across some foam ice cream and popsicle stickers in Target’s dollar section.  They were too cute to pass up.  I thought they were perfect for summer and was sure to put them to good use.

 **If you can’t find them at Target anymore, it would be simple to cut out similar foam shapes.**

I created pattern cards as one activity using the popsicle stickers.  Beforehand, I began both color and shape patterns on cardstock.  I then gave J the pattern cards and a bowl of the extra stickers to continue each pattern.  

With the ice cream cones, I created different color combinations for him to mimic.

After already creating my pattern cards, I thought it would be really cute to have made multiple dips on each ice cream cone for him to mimic.  Opportunity missed on that one!

Btw, J just set the stickers in place so that we could redo the activity again.

Beads and Dot Markers

This week is all about finding multiple uses out of these beads from Melissa and Doug. 

Here’s our last activity using Melissa and Doug’s Lacing Beads.  This is a quick one, but one that kept J entertained for awhile.  Basically I just reused yesterday’s activity, but used dot markers instead.  I set out a few of the multi-colored lacing beads for him to create with the dot markers.

J loves dot markers.  They are a hit everytime I get them out. 


J started just playing around on the yellow, orange and red square and decided to cover the entire thing with red dots 🙂

Beads and Pompoms

This week is all about finding multiple uses out of these beads from Melissa and Doug. 

For this activity I brought out the magnetic pompoms which are always a winner in our house.  Check out this post to see how I made them. 

J used the pompoms to recreate the multi-colored beads.  This is great practice with shapes, colors, and size.  We started with the circle beads since they were the easiest.  He tried starting with the outside color and working his way into the center.  Of course judging the size correctly was difficult and he ended up with empty space between each circle.  I showed him how to start with the center and work out.  Even this simple step added a level of difficulty to the activity since now he had to remember which comes first, second and third. 

We moved onto the square beads next.  These proved more difficult for him to create on his own.  His squares kept looking like circles which frustrated him.  I try to sit back and let him trouble-shoot on his own since that is part of the learning process.  This particular time he eventually asked me how to make them look like squares.  I showed him how to make the corners first and then fill in the rest to create squares.  This provided the perfect opportunity to emphasize the 4 corners and 4 equal sides of a square.

**If you don’t own this set of beads from Melissa and Doug, you could easily draw your own design on cardstock to have your little one imitate.**

The circles were easily within his ability and the squares pushed him a bit.  We didn’t even attempt the star beads because that was too far out of his ability level. A little frustration during an activity can be good (like he had when creating the square beads).  It helps them learn how to deal with it appropriately, keep trying, and even ask if they realize they truly need the help.  Too much frustration however would most likely mean the activity is too advanced for them.  I knew that would be the case if I had asked him to recreate the stars.

Bead Patterns

This week is all about finding multiple uses for lacing beads like these from Melissa and Doug.


Since J is into patterns right now, I thought he would find this entertaining.  I set out the multi-colored beads and had him imitate the color pattern using …. you guessed it, his cars.  Of course you could do the same thing using blocks, magnetic pompoms, or even the solid color beads in the same set. 

Homemade Gift: Magnetic Foam Frames

J made these to give to some of our family as a Christmas gift.  This was a homemade gift he could feel completely responsible for and KNOW that he created it himself. 

Materials: Foam, Magnetic plastic frame (from dollar store), Stickers, Buttons, Googly Eyes, Post-It Notes, Glue

Prep: I cut out the foam frames and gathered materials for J to choose from to create his gifts. **You can also buy prepackaged foam frame crafts and just add the fridge photo magnet on the back yourself.**

We had 4 frames to complete as gifts, so J chose the color for each recipient and the materials to decorate it with.  This also meant that one set of materials weren’t used (he didn’t choose the googly eyes this time).  I helped make sure he was spelling his name correctly on frames (all except one, which he declared was for Grandpa and would hold a picture of Grandma since he loved her so much… hence no need for J’s name on the frame!).  The only other involvement I had in the process was some encouragement to practice creating a pattern with the buttons.  He’s all about patterns right now though so not much need to push with that!

He also didn’t complete all the frames at one time.  After he finished a couple and chose the materials for the others, I packed some up for him to complete on the plane.  This was a great activity to do on a plane, little packing, light-weight and kept him focused.

I was so surprised to see how symmetrical he designed the frame with bubble stickers, maybe he’s finally getting out of that stage where he wants to stack stickers on top of each other! 

After everything had dried, I glued a magnetic frame (bought at a dollar store) onto the back so the frames could be placed on a fridge and photos could be traded out easily. **Be sure you don’t glue the frame closed so that photos can be changed out later.**

Age attempted: 33 months

Pattern Practice with Christmas Ornaments

As a Christmas display, I have a pretty red tray filled with different color ball ornaments.  Last year I decided to purchase some cheap plastic ones both so J could help hang some on our tree (without the stress that he would break one) and so he could play with them throughout Christmas.  A side benefit is they have become a good learning too for J. 

What you need:  a variety of of colorful ornaments, the more you have of each color/type the more patterns possible.  (I found packages of 12 for $1 at the dollar store). 

I used the ornaments to set up a pattern for J to continue.    We started with colors, then added textures to the patterns (glittery, shiny, smooth, and bumpy).  I also had J come up with his own patterns for me to continue.  This adds another level of difficulty to the activity.

You could include other fun ornaments in your patterns too, candy canes, angels, bells,… there are so many options available!   Or just look around at the Christmas decor you have in your home. What can be used for a little pattern practice? I’m sure you can find something!

Age attempted: 31 months

Homemade Toy: Magnetic Pompoms

When I was writing the Apple Picking post, I realized I never actually introduced our magnetic pompoms.  This has been a great homemade toy for J.  I saw it multiple places online when J was much younger and just waited until I was confident he would be safe with the small magnets.  We’ve never had one fall off, but you never know. I wouldn’t leave little ones alone with this toy until you were 100% confident they wouldn’t try a taste test.

This is a great addition to a busy box gift for older toddlers/preschoolers.  Include the pompoms, a small cookie sheet (found at dollar stores) and some blank templates and/or patterns to follow.  A great and unique toy on a budget. It would even be a good homemade Christmas gift.

To Make: All you do is hot glue magnets onto the back of pompom balls.  Use the free magnets you get in the mail to save money or buy roll of magnets from the craft store.  You won’t need an entire roll, so it can be used for other things as well.  Be sure to include a variety of color pompoms and a large number of each color.  The more you have, the more your little one can create.  You can also use multiple sizes of pompoms if you want (I’ve only made one size).  Add a cookie sheet and you have a great toy.   Something about pompoms intrigues kids.

1. They can design pictures freely. 

No my toddler did not create this picture 🙂  This is one I made for him as he called out things to create.  I forgot to snap pictures of his creations, though he makes a pretty good sun!

This homemade toy can be as simple as this and it will be worth the effort.

2. Black and white templates can be printed for them to fill in creatively.

I made this blank pompom template  for J to use.  You can also check out the links at the bottom of this post for sites I’ve found with printables.

3. Color printouts encourage them to match the correct colors.

 Here he is matching the pompoms to the corresponding colored circle in the gumball machine.  This type of activity is especially good for younger toddlers that are still working on their colors and fine motor skills.

It’s really easy to create your own, just copy and paste from Google images and add some colorful circles.

4. Patterns, sorting, counting, and colors

  I started the patterns and he found the right pompoms to continue it.  You could also show them a picture of a pattern and ask them to copy it on their own.  Preschoolers could work on much more intricate patterns or designs.

This shows some color sorting as well as our intro to bar graphs where he compared the different bars to decide which had the most/the least, which were equal,…  We finished by counting each bar to see we were right.

6. Shapes, Location
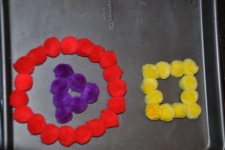
 As of now we create them together, he copies my examples (or tries to),  or he gives me instructions on what to create and where (good directional practice for them).

For older ones you can give them instructions to create a certain color/size shape, include location of the shape to increase the difficulty (ex: make a purple triangle inside the circle).

6. Letters and Numbers  

Have your little one trace letters and numbers or “write” them on their own using the pompoms.  You can draw large block letters or numbers for them to fill in with the pompoms.  They can match the correct number of pompoms next to the correct number.  Or check out the list of online templates I found. 

I’ve seen activity books for Dot Markers that would work well with magnetic pompoms.  Of course any of the templates for magnetic pompoms could also be used with Dot Markers or circles stickers too.

Other Printable Templates: 

Shapes  and Colors (from Home Grown Hearts)

Number cards (from 1+1+1=1)

Numbers (from Making Learning Fun)

Upper Case Letters and Lower Case letters (from Making Learning Fun)

B&W Pictures (From Making Learning Fun)

Color Pictures (From Making Learning Fun)

(For the Making Learning Fun templates, I had to copy the templates and paste it onto ppt to expand each picture.  When I printed these straight from the website, the circles were much smaller than I wanted.)

If you find any other great templates let me know and I’ll add them to the list!

Apple Picking Practice

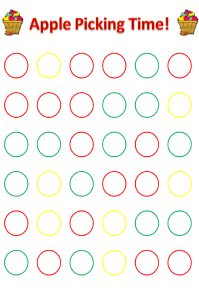
I think everyone should go apple picking in the autumn.  It’s a perfect activity for little ones.  Our trip kept getting pushed back for one reason or another throughout the whole month of October.  In that interim, I made this pretend apple picking sheet for J to work on. He uses his magnetic pompom balls (on a cookie sheet) to complete his apple picking.  I just set out a basket of “apples” for him to choose from, but I think it would be fun to add a hunt around the house for them too.  I originally saw the idea here and just adapted it a little.  After he was finished we counted the number or red, green and yellow “apples” and discussed which color had the most/least apples. 

I'm blaming the blur on my iphone!

I know apple season is over but if you want to try this activity yourself, you can print this pdf form for yourself.  It also has some apple counting and apple pattern worksheets along with it.  Apple picking and patterns

**I’m just noticing that I never posted about the magnetic pompoms, I’ll get back to you on that soon**

Age attempted: 29 months

We did finally make it to the real apple orchard.  Lots of fun!

I wish I could blame the blur on my iphone!

Patterns for Homemade Geoboards

In lieu of Christmas soon arriving, I thought I would introduce/reintroduce some of the great homemade toys that we have around our house.  Homemade toys are perfect for little ones!  Why spend tons of money on things you can make easily?

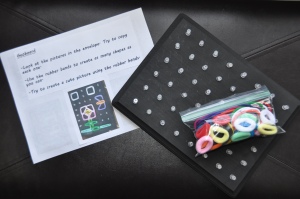
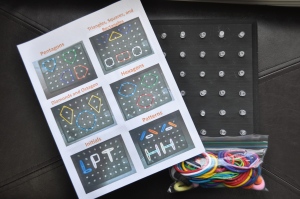
Remember this Homemade Geoboard post?  J still enjoys it today.  I recently put one together for his older cousin and included some example patterns with the board.  I took example photos of shapes, patterns, letters, numbers and pictures on the geoboard for him to replicate.  For even older ones, you could simply include a list of things to create and leave off the pictures.  That would add a level of difficulty. 

I think this would made a great homemade Christmas gift!

20 Month Old Busy Box

I put together these activities for a friend’s little girl.  While mommy is serving in Iraq, I thought this busy box might help to keep her little one busy and hopefully even allow her dad some much needed time off from entertaining.  Most of the activities are homemade, repurposing items from around the house as is my norm. I housed them in a simple decorative box.  J’s own “busy box”  is kept in a closet and the activities are only brought out at certain times throughout the week.  This helps keep it’s novelty.  Some of the activities are repeats from the 1 year old Busy Box I made my niece awhile back, though I tried to make them a bit more difficult for the older age.  You’ll also notice that these activities are mostly ones I’ve mentioned in previous posts.  When I make a busy box, I try to pick the most successful activities from J’s experience, many of these are motor skill activities.  Some of these activities are things Ella can enjoy now and some she will grow into in the next few months.

You’ll have to excuse my poor decorating abilities.  That is certainly not my forte.  Most of the original toys that I made for J aren’t decorated at all.  J never seemed to mind, so hopefully little Ella will look past the covers and still enjoy the meat of the activities!

1.  Pushing Puff Balls – this is a fine motor activity and has always kept J entertained; see this post for more info

2. Color Sorting Pipe Cleaners – again a fine motor activity and I added practice with colors; this is probably the favorite homemade toy for J; see this post and this post for more info

3.  Color Wheel – practice with colors and fine motor skills; you can use the wheel in other ways too. See this post and this post fore more.

4. Puzzles -These foam puzzles were one of the best buys for J. They were just $1 at our local grocery store and I picked them up on the fly one time.  When I saw them there months later, I bought a few more as gifts. I bring the color puzzle on plane trips sometimes since there are few pieces and it’s very light. 

5. Family Bag – this is similar to J’s family magnet pics.  I added each family member’s name to Ella’s pics, laminated them (with contact paper) and gave her a little purse to carry them in.  J has loved his family pics since before he was one.  I thought adding the names could encourage name recognition.

6. Seed Family Worship CD – I had previously sent one of their CDs to my friend while she’s in Iraq, but thought her daughter might like one too.  These cd’s are really great and not just for kids IMO.  They are an excellent way to help us write God’s Word on our hearts.  See this post for more.

7. Fish Counting and Matching file folder game – J has a similar matching game, I just made this one a bit more durable by adding it to a file folder for safe keeping.  The envelope holds the laminated fish cards to match as well as the fish to place on the counting page.  I found the counting template here from Tot school and have used it many times with J.

8. Sponge Jewelry – a fine motor activity and again a favorite of J’s, simply thread the sponges onto the pipe cleaners.  I found a greater variety of sponges for Ella’s jewelry.  A girl needs to match!  See this post for more info.