Tag Archives: Colors

Fun Bubble Wrap “Exam”

This activity is great for so many ages.  Who doesn’t love bubble wrap!!  I must admit that I even still love popping the bubbles just like my 3 year old.  This is also a great way to trick your child into showing off what they know, without them realizing what you’re up to.

Prep:  All you need is a sheet of large bubble wrap and permanent markers.  I filled in the bubbles with numbers, words, shapes, and letters. 

 During the activity: I called out something on the sheet and J found the correct bubble to pop.  Simple as that.  I will say that he did have some trouble popping some of the bubbles so about half-way through, I pulled out a toothpick and let him pop them bubbles that way.  He thought this was just as fun (probably because he doesn’t get to play with toothpicks too often).

You could adapt this for any age to practice whatever they are currently learning from colors and shapes to addition or multiplication, rhyming or grouping.

Age attempted: 3 years

**ETA: I came across the blog where I originally found the idea.  Check out The Activity Mom’s version**

Flower Mobile (or possibly placemat)

J made a flower mobile for his grandma as a get well soon gift.  It would be a great gift for any girl on any occasion really. I think it turned out really cute and J had a lot of fun creating it.  He stuck with it until it was all finished!

What you need:  Construction paper, contact paper, scissors, flower magazine, marker; you will also need a  hangar, a hole punch, and string if you want to create the mobile

Prep Work:  I cut out the borders for each flower, using different colored construction paper.  I also cut out two equal sizes of clear contact paper, taping one to the work-table (sticky side up).  The other piece of contact paper is saved to place on top after the flowers are completed.

During the activity:  J placed the flower-borders onto the contact paper though he needed some help with the larger pieces since they can get tangled easily.  He then searched through a flower magazine to find flowers to fill each border, matching the colors accordingly.  I just had him tear the pictures out of the magazine rather than using scissors.  We then worked together to tear the pictures into small pieces that he could stick inside the corresponding colored flower.  After all of the flowers were filled, we added a message for grandma and J signed one of the flowers himself.  I then placed the second sheet of contact paper on top.  If we were creating a placemat, the activity would basically be done. Just trim the edges of the contact paper to make a more finished look.  (My intention was to create a placemat, but I did not plan well.  The flowers were so huge that the placemat covered half the table! So I improvised and decided this was going to become a mobile instead.)

For the mobile:  I cut apart each flower and punched a hole into the top and bottom.  I also cut small pieces of string to attach the flowers together.  J helped thread the string through the holes and I tied the knots.  We then tied it onto a hangar. 

Age attempted: 3 years

Mix and Match Patterns with Plastic Eggs

Here’s an activity where I’m guessing you won’t have to spend one dime, just use what you already have!  Plastic eggs, crayons, and paper.  This was a great activity I found online that I prepared and stored away for after the baby was born.  I first gathered the plastic eggs from the basement so that I knew which colors I had to work with.  I then colored some mix and match eggs on cardstock. 

I gave J both the cards and the plastic eggs and told him his job was to create eggs to match the cards. 

This activity offered practice with color recognition, size recognition and fine motor skills.

For younger toddlers/preschoolers:  They might need help clicking the egg pieces together, but they can find the correct colors themselves.  Some might not yet be able to recognize the size difference in the top/bottom of the egg.

For older toddlers/preschoolers:  They can practice placing the eggs together themselves.  To add a level of difficulty, be sure to make it clear in your drawing which part of the egg is on top and which is on bottom.  This way they not only have to match the correct colors but also the correct part of the egg. 

Age attempted: 3 years

Stringing Buttons

Iphone photo from plane trip

This is an activity J has done both at home and on airplanes.  I found a big bag of colorful buttons, in different sizes.  Set out some string and he was focused threading them for 30 minutes at least.  This is a good fine motor skill activity.  J is a very organized little boy so he typically wants to sort the buttons by color, matching each with the corresponding color string…. which meant mom had to track down string to match each button 🙂 

We’ve also tried stringing the buttons by size but this hasn’t been J’s favorite activity.  He’d much rather sort colors.  It’s still a great practice activity to try.  I’ll bring it out again after awhile.  If you do plan on sorting by size, I would start with a just a few buttons and as your little one excels increase the number of buttons to sort and/or decrease the difference in sizes. 

Traveling:  We started using this activity on planes when J was old enough to keep track of the buttons.  We keep them in a ziploc and he takes out one at a time.  I only bring the larger buttons with us and he strings them on  pipe cleaners instead of string.  I like multiple uses for travel toys and pipe cleaners offer lots of other uses.

Lesson learned: Using pipe cleaners to thread is much easier than using string.  This makes activities like this (or stringing beads, stringing sponges ) possible for younger ones. You can bend down the sharp ends of the pipe cleaners.

Age attempted: 27 months

Sticker Activity on the Plane (or at home!)

He asked me to draw more smiley faces on the paper afterwards.

In my post  about our last plane trip, I mentioned a sticker activity that J did on the plane.  It worked perfectly for the trip so I thought I would share.

I had some smiley face stickers in various colors that J has for whatever reason fallen in love with.  On a sheet of paper I made 5 large circles using the colors of the stickers I had (purple, red, green, yellow and pink).  I gave J the sheet of stickers along with the paper with empty circles and he placed the stickers inside it’s circle match.  We then counted the number of stickers inside each circle, which in our case was different for each circle. 

This offered practice matching colors, some fine motor practice (peeling the stickers off and placing them in the correct spot on the paper), and then with counting too.  It wasn’t too hard for J, which is ideal for plane activities.  I like the activities we do to keep him busy, involve my help at times, but also something he could do on his own.  Because there was a set goal to be accomplished, it kept him busy until all stickers were transfered.  As he’s getting older, TIP: I like our plane activities to have specific goals to encourage him to stay with it longer than he might if left on his own since my offical goal is to keep him occupied and content for the duration of the flight.  If he wants to do more stickers afterwards that’s fine, but I know he will at least remain occupied until the end of the activity. Of course this activity doesn’t have to be done on a plane. 

You could do the same type of activity while practicing shapes and number recognition too (in fact, there’s a number activity coming up in a future post).

Age: 25 months

20 Month Old Busy Box

I put together these activities for a friend’s little girl.  While mommy is serving in Iraq, I thought this busy box might help to keep her little one busy and hopefully even allow her dad some much needed time off from entertaining.  Most of the activities are homemade, repurposing items from around the house as is my norm. I housed them in a simple decorative box.  J’s own “busy box”  is kept in a closet and the activities are only brought out at certain times throughout the week.  This helps keep it’s novelty.  Some of the activities are repeats from the 1 year old Busy Box I made my niece awhile back, though I tried to make them a bit more difficult for the older age.  You’ll also notice that these activities are mostly ones I’ve mentioned in previous posts.  When I make a busy box, I try to pick the most successful activities from J’s experience, many of these are motor skill activities.  Some of these activities are things Ella can enjoy now and some she will grow into in the next few months.

You’ll have to excuse my poor decorating abilities.  That is certainly not my forte.  Most of the original toys that I made for J aren’t decorated at all.  J never seemed to mind, so hopefully little Ella will look past the covers and still enjoy the meat of the activities!

1.  Pushing Puff Balls – this is a fine motor activity and has always kept J entertained; see this post for more info

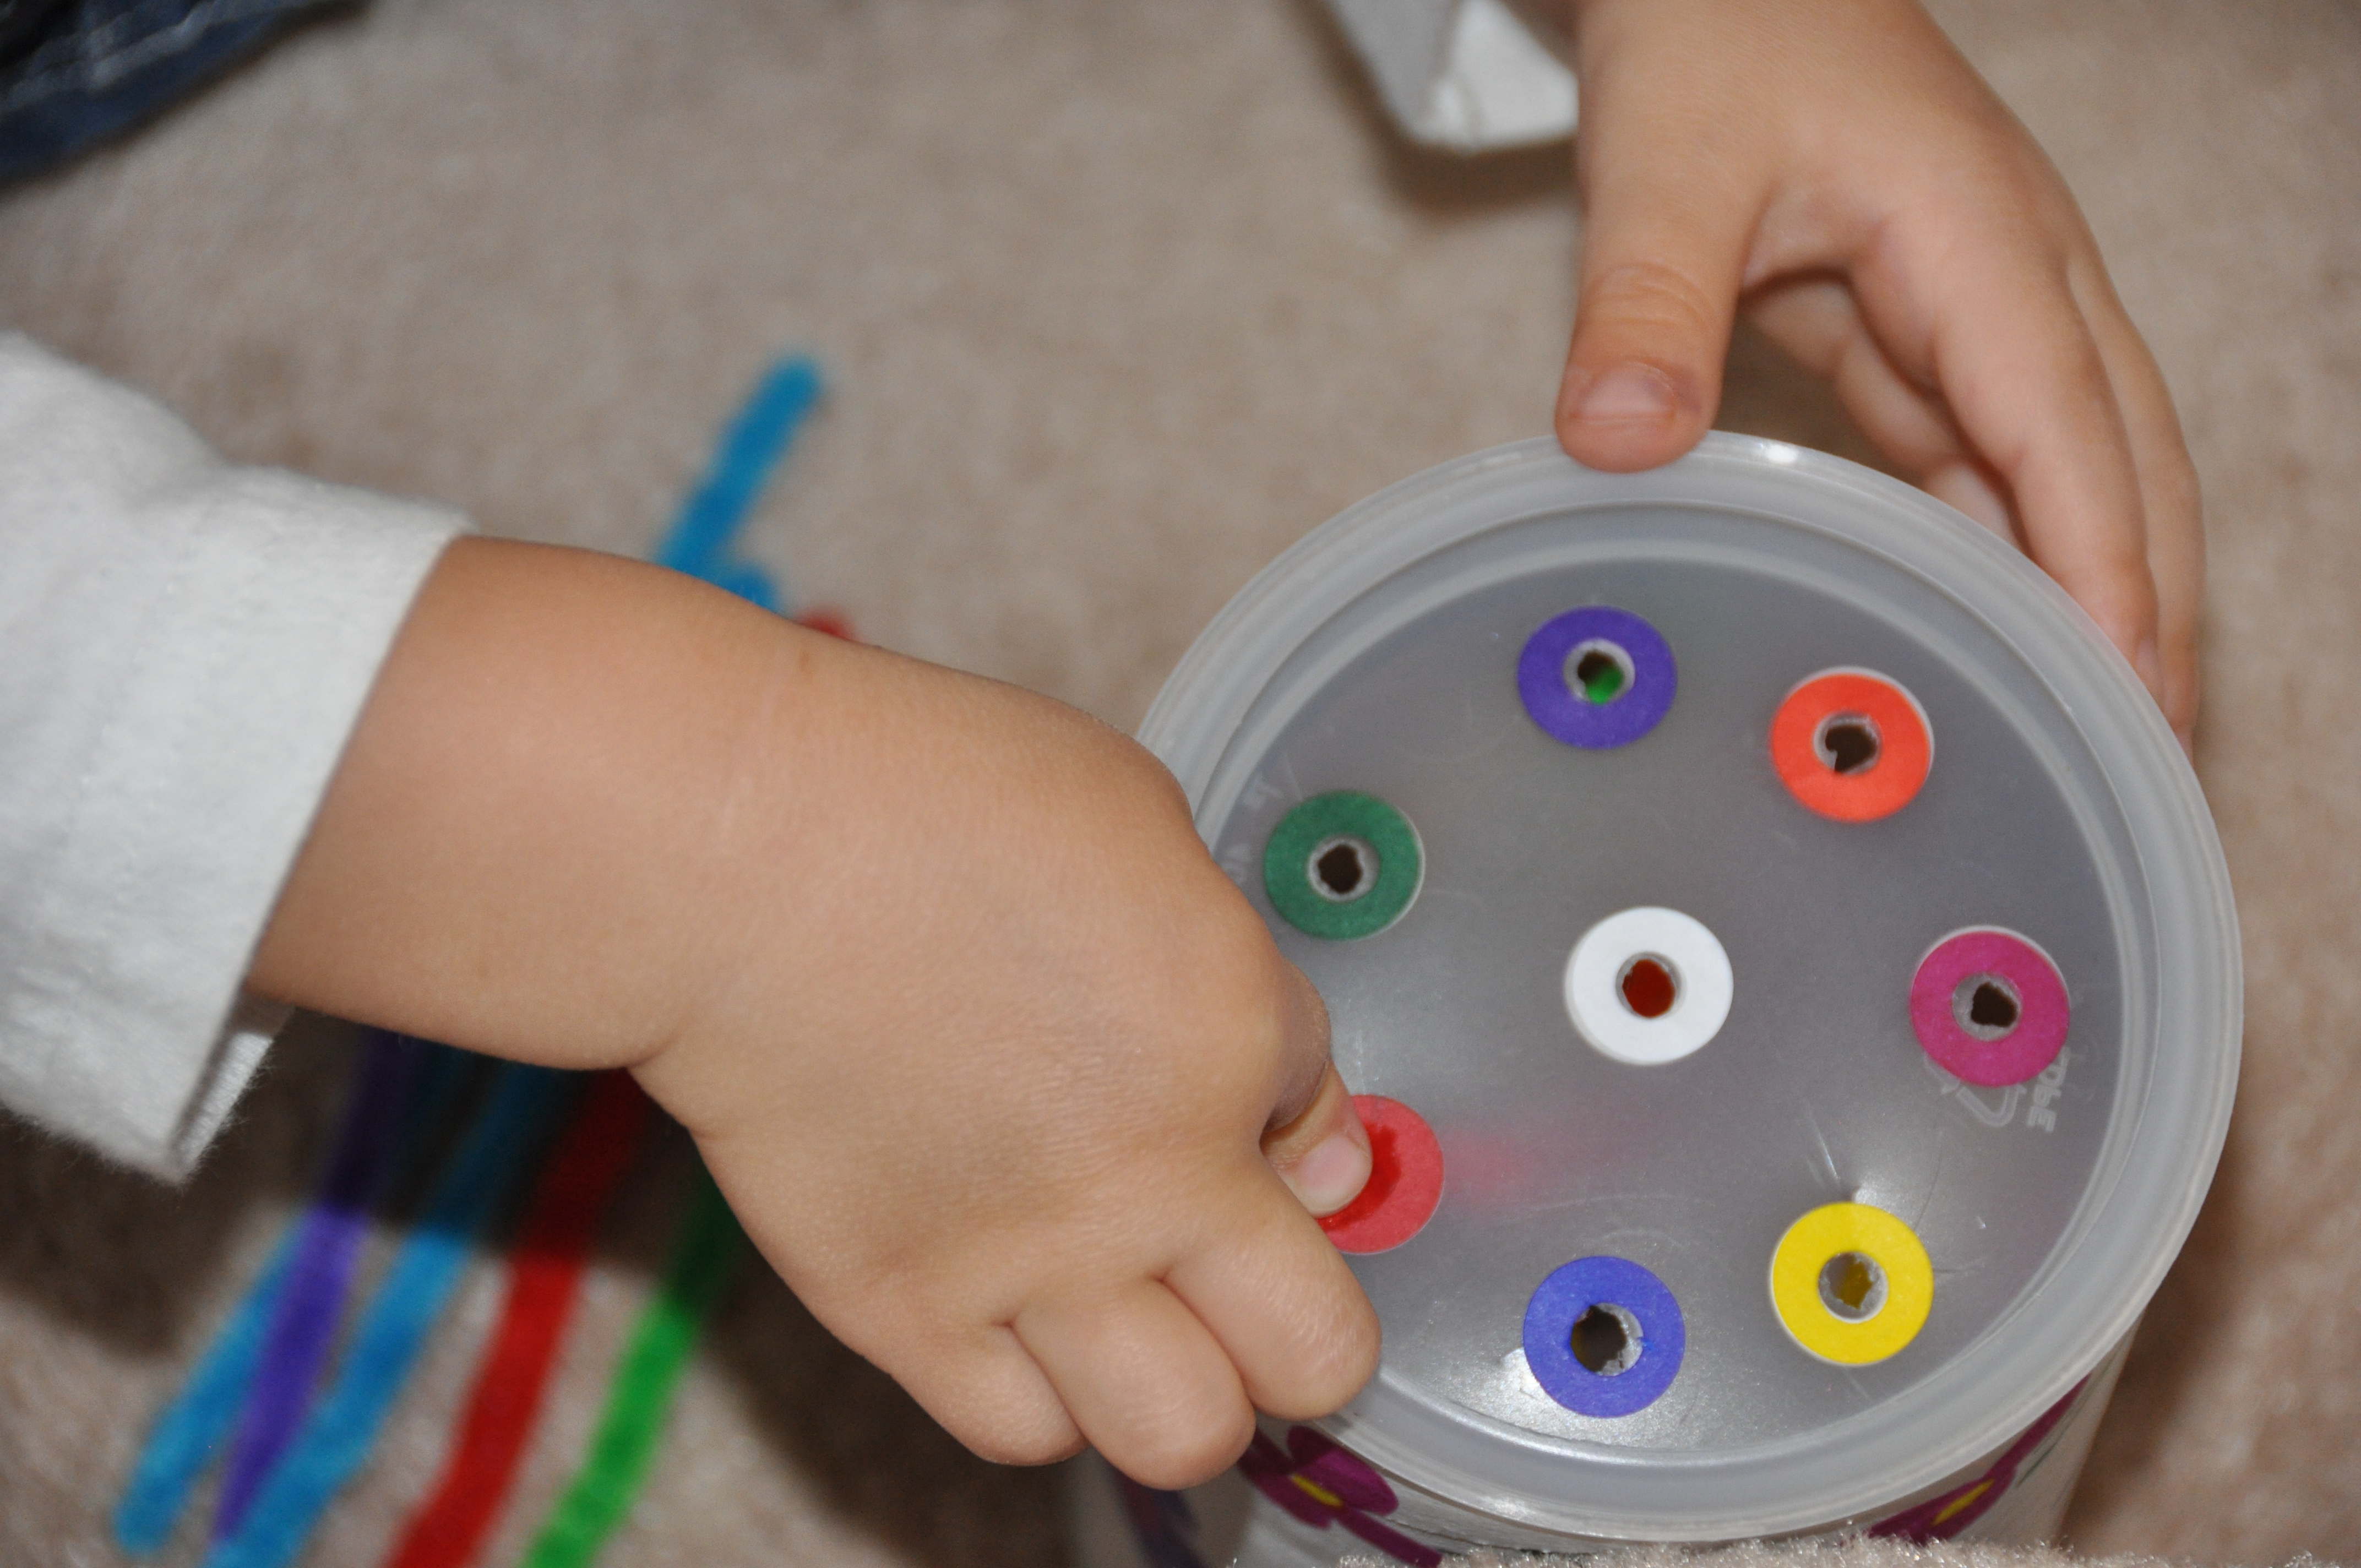
2. Color Sorting Pipe Cleaners – again a fine motor activity and I added practice with colors; this is probably the favorite homemade toy for J; see this post and this post for more info

3.  Color Wheel – practice with colors and fine motor skills; you can use the wheel in other ways too. See this post and this post fore more.

4. Puzzles -These foam puzzles were one of the best buys for J. They were just $1 at our local grocery store and I picked them up on the fly one time.  When I saw them there months later, I bought a few more as gifts. I bring the color puzzle on plane trips sometimes since there are few pieces and it’s very light. 

5. Family Bag – this is similar to J’s family magnet pics.  I added each family member’s name to Ella’s pics, laminated them (with contact paper) and gave her a little purse to carry them in.  J has loved his family pics since before he was one.  I thought adding the names could encourage name recognition.

6. Seed Family Worship CD – I had previously sent one of their CDs to my friend while she’s in Iraq, but thought her daughter might like one too.  These cd’s are really great and not just for kids IMO.  They are an excellent way to help us write God’s Word on our hearts.  See this post for more.

7. Fish Counting and Matching file folder game – J has a similar matching game, I just made this one a bit more durable by adding it to a file folder for safe keeping.  The envelope holds the laminated fish cards to match as well as the fish to place on the counting page.  I found the counting template here from Tot school and have used it many times with J.

8. Sponge Jewelry – a fine motor activity and again a favorite of J’s, simply thread the sponges onto the pipe cleaners.  I found a greater variety of sponges for Ella’s jewelry.  A girl needs to match!  See this post for more info.

Cars and Color Wheels

I came across this addition to the color wheel and knew it was perfect for J.  He loves cars and loves lining things up.  Perfect.   Well, the first attempt went just ok.  He matched one car to each color on the wheel and didn’t get what to do after that.  I tried showing him to line up the cars behind each color, but he wasn’t satisfied with that.  He wanted the car ON the appropriate space in the color wheel and since he couldn’t fit them all on the wheel, he contented himself with filling the wheel and was done.  Of course this still accomplishes the goal of matching colors.  It wasn’t until the second time I brought this activity out that he enjoyed lining the cars up.  It was good practice matching similar colors and did need some help with a few.

Age attempted: 1st – 24 months; 2nd- 25 months

Color Wheel for toddlers

I’ve seen this activity on tons of blogs since I first started looking and finally thought J was old enough to manage it.  The first time I brought it out he was excited but soon just wanted to point out where each clothespin belonged and have me do the physical labor.  Pinching the clothespin was difficult for him.  I felt ridiculous that I couldn’t figure out a good way to teach him to use the clothespin.  A week later we tried again.  We practiced opening and closing the clothespins together and I realized he could manage them on his own if he used both hands.  So for now I hold the color wheel for him while he squeezes the clothespin open.  Hopefully he will soon develop the hand muscles needed to have more control.  Since he knows his colors, the fine motor skills is really the purpose of this activity. 

(I don’t have a pic of J in action because I don’t have a free hand to snap the photo)

Age attempted: 24 months

Increased difficulty to pipe cleaner toy

I finally made a harder version of the pipe cleaner toy that J loves.  It was one of the first activities I found when websurfing but of course I didn’t save the link so I have no idea where the idea came from.  ETA: I found the link

This particular one is actually a gift for a friend’s little girl, but I let J give it a trial run.  I should’ve made this for him when he was younger.  It would’ve been a great challege for colors; now it’s just good practice.   The original pipe cleaner toy  is SUCH a huge hit and has been for a full year now.  It is probably the top homemade toy in our house (or at least in the top three).  As he got older of course it got easier.  Adding the color matching to the toy makes gives him one more challenge to the task. 

This particular toy is an empty oatmeal container.  I used a knife to cut holes into the lid and added some reinforcements that I colored to match the pipe cleaners.  Done! 

UPDATED: A reader just asked me a great question that might help others out too! 

How do you avoid the sharp end of the pipe cleaner?

I’ve always folded and twists the ends over to keep from that sharp exposed wire. When J was really young, I twisted them in half since that length was enough of a challenge for his fine motor skills.  As he got older I could lengthen the pipe cleaners and just fold down the edge. This doesn’t remedy the problem completely, but it keeps their fingers from getting poked.  It’s still something you want to watch since eyes can get poked. Oh and I’ve found the cheaper pipe cleaners have less fluff around them which means the ends poke more. You could also use colorful straws instead of the pipe cleaners. That might be a great option for some.  I preferred pipe cleaners since we used this activity on planes most often and I liked that the pipe cleaners could be used for lots of other activities on the trip as well.
Age attempted: with colors, 24 months but could be done much much earlier; without colors, around 12 months

Whistle Stacking


I came across these whistles at the party store (I think 12 per bag) and decided they would be an easy and cheap toy for J.  I of course don’t use them as whistles, but as a stacking toy for him.  They’re great to use for separating colors and for creating patterns.  I have also rolled out some playdoh and had him stack them the opposite way (small side stuck into the playdoh).  Maybe I’ll create a peg board at some point so that it works better.  For now, he enjoys stacking them as in the photo and of course knocking down the towers and rolling the pieces all over the floor! 

Age: 24 months, but this would be a great toy for a younger toddler.