Category Archives: Math

Heart of Giving: School Supplies

Free back to school clip art of black board with apple message.This is the time of year when many organizations are collecting school supplies for those in need.  Our church is one of the many.  We read through our church bulletin together and I explained the need to J.  He’s so excited about going to school with his backpack in hand and wanted other kids to have a backpack too.  The bulletin announcement had a list of sugggested supplies. J and I used that list to create our own picture list on ppt.  I read the item, typed it into clipart and J chose which  picture to use.  This made even list-making an activity he could participate in.

To add some math practice, include how many of each item is needed.  Then have your little one read the list and count the correct number to place in your shopping cart. Of course I didn’t think of that while making our own list!

We printed our picture list and headed to the store to make our purchases.  J “read” the list and called out the next item needed. Of course his favorite was crossing off each item with his highlighter! When we got home I set out all the supplies for him to fill the backpack with and it now sits by the door, waiting to be brought to church.  I plan on having J turn it in himself.

This is a great act of service to get kids involved in since they so easily relate.  Do a quick search for those collecting school supplies in your area, maybe a local church, YMCA, Boys and Girls Club, etc.  As a former teacher I know all you really need to do is call up your local school, and ask them for a list of supplies needed.  There were always students in need on the first day of school.

Sidewalk Chalk Math

Yup, we’re still using sidewalk chalk A LOT.  It’s still one of my all-time favorite learning tools!  It’s a great (and easy) way to create multi-sensory learning. Remember hearing about learning styles back in college?  We all have our ideal method of learning (auditory, visual, kinesthetic/tactile).  The most efficient lessons are those that utilize each learning style.

Onto the activity…

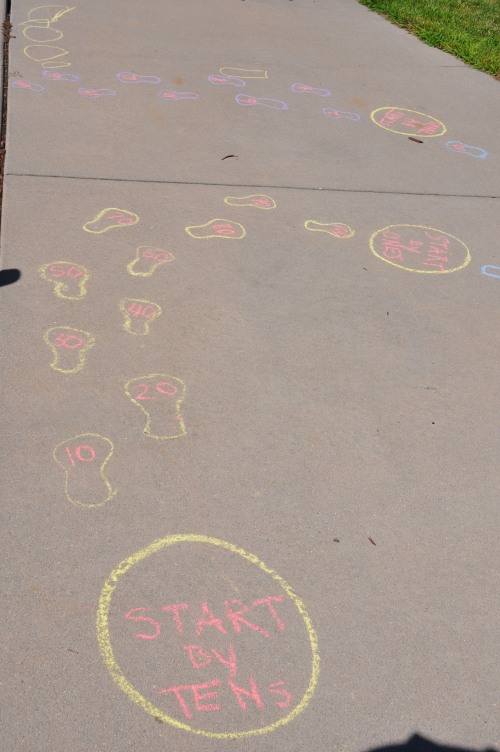
This summer, J really got into tracing his footprints onto the sidewalk.  We would trace all sorts of fun paths that he would then follow while running, jumping, skipping (or giving it his best attempt!), pushing his lawn mower or riding his tricycle.

After a few weeks of this, I decided to add some learning to the mix 🙂

First, I added a letter to each footprint.  J loved singing the Alphabet song while following his footprint path. Next was numbers, logically! That’s when I realized this would be great practice at counting by twos, fives, and tens.  I placed one number in each footprint and got J to call out the numbers as he jumped across. He actually learned a cute counting song from one of the Leapfrog movies that takes you through ones, twos, fives and tens. It works perfect with his footpaths.

This incorporates auditory (singing), visual (written numbers) and kinesthetic (physical movement with each number).

Here’s some other activities to do with sidewalk chalk.

Homemade Sunbleached Puzzles

I came across this brilliant idea for sunbleached puzzles.  They were so easy to create and great entertainment (and practice) for a puzzle-lover. It was also a great little lesson in the sun’s effects.

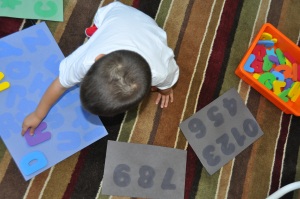
I set out foam bath letters and numbers on dark construction paper and left them to sunbathe awhile on the deck.  J enjoyed watching the process, impressed by the magical results! We then brought it all inside to start putting it all together.  You can make this activity more difficult by adding extra foam letters to the choices.

This is great practice at letter recognition.  It’s also great way to help them learn how to spell their name, memorize their phone number or address. 

The link above used magnetic letters and shape blocks to create their puzzles.  You could also cut your own shapes out of colorful foam.

Ice Cream and Popsicle Patterns

I came across some foam ice cream and popsicle stickers in Target’s dollar section.  They were too cute to pass up.  I thought they were perfect for summer and was sure to put them to good use.

 **If you can’t find them at Target anymore, it would be simple to cut out similar foam shapes.**

I created pattern cards as one activity using the popsicle stickers.  Beforehand, I began both color and shape patterns on cardstock.  I then gave J the pattern cards and a bowl of the extra stickers to continue each pattern.  

With the ice cream cones, I created different color combinations for him to mimic.

After already creating my pattern cards, I thought it would be really cute to have made multiple dips on each ice cream cone for him to mimic.  Opportunity missed on that one!

Btw, J just set the stickers in place so that we could redo the activity again.

Create Your Own Number Book

I remember making one of these in kindergarten.  Ok, honestly my memory doesn’t work that far back but I do remember seeing the one I made in kindergarten.

J’s is not quite as fancy but it served the same purpose and he is just as proud of authoring his very first book.  We even added it to his bookshelf and he often picks it out for us to read together!

PREP: I prefolded and stapled the pages together. (My teacher used a hole punch with rings to connect the pages.) I had a sheet of number stickers from an old workbook with both the numbers and objects to count.  This made the prep-work simple since all I had to do was pull out one sheet of stickers.  I did quickly add some stickers of like objects, cut into strips for him to count (a strip of 3 smiley face stickers, 4 stars, 5 balloons, etc.) and some individual stickers of a group of objects for him to count (a bouquet of flowers, a basket of eggs, etc).

ACTIVITY: We went through and wrote one number on each page.  I then gave him the sheet of number stickers and he matched the stickers to the correct page.  He then counted the items on each sticker to place on the correct page. We gave his book a title, “J’s Number Book” (genius I know!) and he had his very first book.

We did this activity at home while I fed baby brother.  It required very little physical help from me.  My job was basically to encourage.  This would be a great travel activity.

Beads and Dot Markers

This week is all about finding multiple uses out of these beads from Melissa and Doug. 

Here’s our last activity using Melissa and Doug’s Lacing Beads.  This is a quick one, but one that kept J entertained for awhile.  Basically I just reused yesterday’s activity, but used dot markers instead.  I set out a few of the multi-colored lacing beads for him to create with the dot markers.

J loves dot markers.  They are a hit everytime I get them out. 


J started just playing around on the yellow, orange and red square and decided to cover the entire thing with red dots 🙂

Beads and Pompoms

This week is all about finding multiple uses out of these beads from Melissa and Doug. 

For this activity I brought out the magnetic pompoms which are always a winner in our house.  Check out this post to see how I made them. 

J used the pompoms to recreate the multi-colored beads.  This is great practice with shapes, colors, and size.  We started with the circle beads since they were the easiest.  He tried starting with the outside color and working his way into the center.  Of course judging the size correctly was difficult and he ended up with empty space between each circle.  I showed him how to start with the center and work out.  Even this simple step added a level of difficulty to the activity since now he had to remember which comes first, second and third. 

We moved onto the square beads next.  These proved more difficult for him to create on his own.  His squares kept looking like circles which frustrated him.  I try to sit back and let him trouble-shoot on his own since that is part of the learning process.  This particular time he eventually asked me how to make them look like squares.  I showed him how to make the corners first and then fill in the rest to create squares.  This provided the perfect opportunity to emphasize the 4 corners and 4 equal sides of a square.

**If you don’t own this set of beads from Melissa and Doug, you could easily draw your own design on cardstock to have your little one imitate.**

The circles were easily within his ability and the squares pushed him a bit.  We didn’t even attempt the star beads because that was too far out of his ability level. A little frustration during an activity can be good (like he had when creating the square beads).  It helps them learn how to deal with it appropriately, keep trying, and even ask if they realize they truly need the help.  Too much frustration however would most likely mean the activity is too advanced for them.  I knew that would be the case if I had asked him to recreate the stars.

Bead Patterns

This week is all about finding multiple uses for lacing beads like these from Melissa and Doug.


Since J is into patterns right now, I thought he would find this entertaining.  I set out the multi-colored beads and had him imitate the color pattern using …. you guessed it, his cars.  Of course you could do the same thing using blocks, magnetic pompoms, or even the solid color beads in the same set. 

Counting Beads

I’m always trying to think of different uses of the same old toys.  This set of lacing beads from Melissa and Doug has found many uses, all of which have been winners for J.  This week I’ll highlight some of the ways we’ve used these beads. 

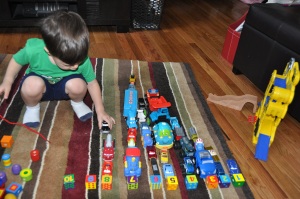
J set the number beads in the correct order and then created a “graph” of sorts by lining up the corresponding number of cars beside each bead.  In hindsight, I should have set out cars that were all similar lengths.  There was no planning involved in this activity though.  I just needed something to hold his attention long enough for me to feed his brother.  It worked 🙂

Fun Bubble Wrap “Exam”

This activity is great for so many ages.  Who doesn’t love bubble wrap!!  I must admit that I even still love popping the bubbles just like my 3 year old.  This is also a great way to trick your child into showing off what they know, without them realizing what you’re up to.

Prep:  All you need is a sheet of large bubble wrap and permanent markers.  I filled in the bubbles with numbers, words, shapes, and letters. 

 During the activity: I called out something on the sheet and J found the correct bubble to pop.  Simple as that.  I will say that he did have some trouble popping some of the bubbles so about half-way through, I pulled out a toothpick and let him pop them bubbles that way.  He thought this was just as fun (probably because he doesn’t get to play with toothpicks too often).

You could adapt this for any age to practice whatever they are currently learning from colors and shapes to addition or multiplication, rhyming or grouping.

Age attempted: 3 years

**ETA: I came across the blog where I originally found the idea.  Check out The Activity Mom’s version**