Category Archives: Early Toddler (18-24 months)

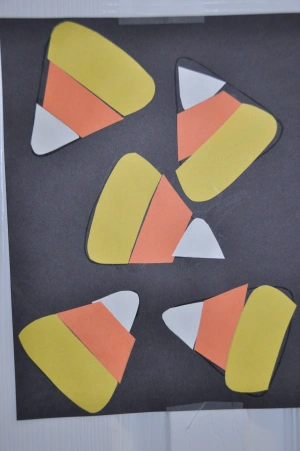
Candy Corn Puzzles

I thought this would be a good activity to work on sizes.  I prepped the activity by precutting the pieces, creating small, medium and large pieces similar to candy corn. If you can tell in the picture, I also drew the outline of the candy corn on the black paper.  This step probably wasn’t needed though.  J glued the pieces in order (small, medium, large) to create the candy corn.  I did have examples of candy corn out (since he’d never seen them before!).  This was simple to prep and good practice for J.

We also used this same concept to create door knob hangars for J’s cousins.  I precut the black paper, including the circle for the door knob and J decorated it with a smaller version of the candy corn puzzles and adding their name.  Later I covered them with clear contact paper for durability.  You could also use foam or cardstock if you didn’t want to “laminate” them. 

Age Attempted: 30 minutes

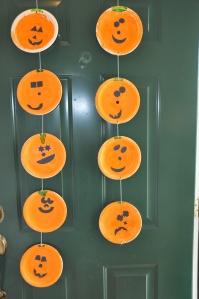
Matching Craft with Jack-O-Lanterns

These pumpkins were fun to make and they incorporated a few new shapes and lots of matching practice for J. 

Prior to this activity, you need to have a selection of eyes (each pair a different shape), nose (shapes to match the eyes) and mouths cut out.

**There aren’t noses on this example b/c I wasn’t intending to include noses at first.

I first had J paint a bunch of plates orange with a small green stem at the top of each one.  We made eight different plates so I did help paint some of them.  I think he focused on 3 while I did the rest.  You could  just print off some pumpkin clip art online instead of painting (but then you’d miss some of the fun!).

The next day when the plates were dry, I set out the collection of mouths to choose from and J glued one mouth on each plate.  We focused on location, the mouth is at the bottom of the face and he tried to glue in in the appropriate spot on each plate.  I then set out the eye choices, mixing up all the different shapes and he had to match the shapes to create each pair of eyes.  I was intending to stop here, thinking the activity was long enough already, but J insisted they needed noses.  So I quickly prepped some noses and he matched them to the correct plate. 

We strung the string through each plate and hung them on our door.  J was quite proud!

Age attempted: 30 months

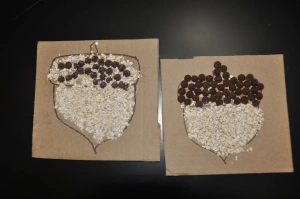
Chocolate Oat Acorns

This was another of our autumn activities.  It’s fun, cute and easy prep (using things I already had around the house). 

Before hand, I cut out a square with cardboard (the original activity said to use a paper bag, but I didn’t have any).  I also drew the acorn onto the cardboard. 

I first had J use a brown crayon to color the “hat” of the acorn and a white crayon for the bottom.  He then glued the chocolate unto the hat and the oats onto the bottom.  We focused on trying to fill the ENTIRE hat/bottom, making that the goal.  Fortunately he had no idea you could EAT the chocolate and so didn’t try until I suggested it (when he was finished with his acorn). 

Once the glue was dry we emptied the excess. 

Age attempted: 30 months

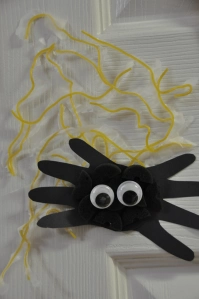
Spaghetti Spider Web and Handprint Spider

We’ve been reading Eric Carle’s The Very Busy Spider, so we did this activity to go along with it.

WEB: I decided to do this last minute since I had all the materials on hand anyway.  All you need is cooked spaghetti, glue, and wax paper.  Dip the spaghetti into the glue and then lay it onto the wax paper.  When finished, let the glue dry COMPLETELY and then peel it off the wax paper. It’s possible I used too much glue since after J was finished, I went back and drop some glue on the spots where the spaghetti overlapped.  It did help the “web” stick together, but made it hard to remove from the wax paper. 

SPIDER: Trace handprints on black paper and then cut out (removing the thumbs).  Glue the palm portion of the handprints on top of each other.  Glue black pom poms onto spider body (I used black sponge curlers cut up into pieces b/c it’s what I had).   Top with googly eyes. This was easy and quick to do.

Age attempted: 30 months; J LOVED this activity, especially making the web (though obviously his web is quite sporadic and not at al symmetrical!).  It was really easy but quite unique.

My Little Helper: Washing the Car

J loves to wash the car.  We do try and emphasize what a great helper he is by working with Daddy/Mommy to get the car clean and shiny, but really he scrubs because he loves it!  He loves anything involving cars really.  🙂

I don’t think we need an explanation of what to do.  J gets a sponge and a bucket of water.  (The pic shows the new foam water shooters and of course he loves to shoot water on the car with those as well; they’ve become his version of hosing down the car.)

My Little Helper: Mopping the floor

Here’s an idea from Raegan at Children’s Learning Activities that I’m now finally letting J do with me.  I’m not sure why it took so long to let him try since he’s been sweeping the floors with me forever.  I invisioned water everywhere, but he really doesn’t create a huge mess.  I’m getting the floor wet anyway, so a little extra water isn’t such a big deal…. as long as he stays away from the carpet! Thankfully he’s great at keeping within the boundaries I give him.

Basically I give him a sponge and a bowl of water (a tiny bit of water goes a LONG way!).  Oh and squeezing the excess water out of the sponge is a lesson they need to be taught!  There are SO many tiny things that J needs to be taught that I completely overlook and this was one of them. 

I wouldn’t say J’s honed his mopping skills quite yet, but he loves to help and that’s what I want to encourage!

Age: started around 24 months

Planning Activities

I thought I would include how I plan our weekly activities.  Organization is not my forte.  I love it but have a hard time sticking with it. Hence, even these simple plans don’t get written each week.  Some weeks I’m more in the mood for sponteneity, another one of my  loves!  So we now pretty consistently go back and forth between weeks (or days) of planned activities to weeks (or days) of sponteneity. 

When I write out the weekly activities, I know that they probably won’t all get done.  I don’t feel a need to stick to the plan completely.  If J’s especially interested in one activity, we keep at it longer and push other activities to a later date.  If we wake up and the temps have dropped from 95 to 78, we throw all planning aside and go to the zoo (like today!).  On an average week we get through half to two-thirds of the activities, though there are rare weeks where less is completed… and even  rarer weeks where more is completed.

All that being said, planning something out really keeps me from letting him play with cars all day while I get distracted with other things.  Cars are great (and J does get to enjoy them a little every day) but a little variety in our day is great for both of us too!

Onto an example schedule:

This particular example is probably from 16 or 17 months??  It is one of my earlier schedules.  Back then I was more likely to fill in every box.  Current schedules have more empty boxes!  Note too that many of the activities planned are repeats; they are NOT all new for J.  He doesn’t need 20 new activities each week.  I would estimate that he gets 1-3 new activities every 2 weeks and even then sometimes “new” simply means mommy tweaked an old activity.  It’s new in J’s eyes though!

LESSON: I first include the lesson to be focused on that day.  There isn’t necessarily a specific time where I sit him down and teach him the meaning of “empty/full” but rather this row explains what I’m planning our lessons around for that day.  I give him lots of opportunities to experience that particular lesson throughout the day.  Our lessons may be letters, numbers, shapes, colors, concepts, Biblical/moral lessons, discipline training, physical actions, simple science, …

TT=Table time and Craft Time: We first started TT when J was around 13 months old.  It’s basically an activity done at the table.  Shocking name, huh! It typically focuses on hand manipulation and fine motor skills.   I have since combined TT and Craft time and we typically do one OR the other, not both in one day. When we started I could easily fit both into the daily schedule because his attention span was shorter and activities didn’t last as long.  Theytypically lasted 10-25 minutes each back then.  Now they last 20-40 minutes, depending on the activity.

Game: If the activity has a certain end goal to accomplish yet isn’t done at the table, I call it a game.  Typically these things combine gross motor skills and incorporate the lesson of the day. 

Outside: I include this in my planning because otherwise we end up doing the same thing every day.  Sometimes our outside activities incorporate the lesson of the day but often it is just my way of being sure I keep some variety!

Here’s a second example schedule, this one has lots more empty spaces! If I remember correctly, we didn’t get to any of Tuesday’s activities until the following week and I never did the Egg puzzles with him.  We were either out of town that weekend or the whole day was planned for work and errands.


Overall the lesson plan takes maybe 5 minutes to complete.  I have a list of overall goals that I refer to when choosing my daily lessons.  (I’ll probably include a separate post on that).  The chart I use is in PowerPoint.  I cut and paste the previous week’s schedule and change out the lessons and activities.  It’s not like I’m going crazy here 😉  Any prep for an activity is done 2 minutes before the activity begins, the night before, the morning of, or on rare weeks I’ll prep days before! Can you tell I’m quite flexible? 🙂  I do tend to have evenings where I’m in the right mood to prepare multiple homemade toys/activities for J to use in the upcoming weeks or months.  Those nights I’ll spend 3+ hours prepping.  Usually prep takes just a few minutes since most activities are repeats from weeks past.

So this is what works for our house. What works for you?  I’d love to hear your ideas!
New Favorites Page!

Check out the new favorites page in the top toolbar.  If you’re looking for a quick list to choose from to get started, I would recommend choosing from that page. I tried to organize based on what would’ve helped me the most when I first started.  These are all activities J enjoyed the most.    I split up the top activities by age groups and then separated crafts from homemade toys/games.  Remember that the age groups are generalizations, you will probably find activities that your little one could enjoy at an earlier age as well as activities that might need to wait for awhile.  I have only one child to base my generalizations on!

My criteria for a “Favorite” is: 

  • lots of mileage.   
  • easy to implement
  • easy to clean
  • entertain for a realistic period of time
  • cheap/worth the expense
  • encourage development

Many are activities that I have heard other mom’s say say their little ones adored too.

I hope this helps streamline things a bit!

4th of July Activities in action (part 1)

So today we did the first few activities from my 4th of July list.  I thought if we’re gonna celebrate Independence day, he needs to know a little more than red, white, and blue 🙂  So we started with the country we live in.  My goal was for him to recognize the map of the U.S., know that he lived there (and maybe even pinpoint the location on the map), know our country’s name (shortened to USA since he is a toddler!) and recognize our flag.  Too much?  I figured it doesn’t hurt to try.  There is no test in the end, so we succeed no matter what.  And I’m a former history teacher, so we’re stepping into mommy’s interests!

1. Introduction to U.S. map – I found a dry-erase map of the U.S. in the dollar section at Target and finally put it to use.  I explained that it was a map of the U.S., we traced around the borders with the dry-erase marker (his first time to use one and he thought it was cool!).  I then explained that this was where we lived.  We drew a dot there and I set a small picture of our family next to the dot (I use pics a lot to help him visualize).  I then put a dot where J’s grandparents live and we placed a small picture of them next to the spot.  I  drew dashes to connect the two spots and pulled out J’s toy airplane to show how we fly back and forth to visit.  He connected the dashes (kinda) to create a line between the two spots and then just drew all over the map!  At some point he noticed that the backside had a map too and wanted me to point our home and Grandpa’s home out once again.  When dad got home that night, I brought the map back out and J was excited to show off where everyone lived and how we fly from one place to the other.   

**I’m excited to go back to the map some time in the future and learn where other close family members live, but for now I thought 2 was enough!

2. U.S. poster (letters, flags, and map) – I printed out a simple map of the U.S. and we again labeled where we live as well as J’s grandparents.  I had some USA stickers that he placed on the paper, allowing me to emphasize our country’s name.  Then I let him glue a few printouts of the U.S. flag on the page too.  My goal was for him to start connecting the three (map, name, flag) together. 

3. U.S.A. letter activity – I wrote down USA at the top of the paper and he used that as a model to glue letter printouts in order.  It was the first time I’ve introduced the letters U and S, so it was a lot at one time.  It really became practice in following directions for him more than anything. 

**We taped both #2 and #3 activities on the front door so that there will be lots of opportunities to review.


4.  Decorated the flower bed with U.S. flags

5. Decorated the storm door with 4th of July gel stickers

Each rectangle looked something like this

6.  Counting stars and stripes – We’ve been focusing no the number 3 recently, so I included some stars and strips in our counting practice.  We have some sliding doors that have molding throughout to create multiple rectangles in the windows (that’s the best way I can think to explain it, I’m sure lots have something similar).  I taped the number 3 inside one of the rectangles and then had J place 3 stars and 3 stripes inside each rectangle.  We used gel stickers for the stars and I just cut the stripes out of red construction paper prior to the activity.

All the activities combined probably took a grand total of 30 to 40 minutes tops (with the exception of #5 and #6 which were done a few days prior).  They were all spaced out throughout the day rather than all back to back. 

Age: 26 months

Fourth of July

While we have yet to complete all of our 4th of July activities, I thought I would share what’s in the works in case someone’s looking for ideas.  I’ll try to add pics as we complete the activities. 

1. Our normal window decor using gel stickers

2. Introduction to U.S. map (pinpoint where family lives)

3. U.S.A. letter activity

4. U.S. poster (letters, flags, and map)

5. Stars and stripes counting

6. Flag craft with twizzlers

7. Red, White, and Blue search

8. Draw sidewalk chalk stripes and star relay

9. Star craft (add red, white and blue streamers on cardboard star)

10. Decorate yard with flags

The list is a little long, but notice that most of the activities are very simple, little to no prep and completed fairly quickly.  I’m planning on using the activities to help reinforce counting, simple patterns, basic knowledge of geography (recognize US map and where he lives, U.S. flag, and name of country), and I guess colors again.

I’m focusing first on the map and correlating it with the U.S.A., our flag, and where he lives.  Then I will be doing some simple flag/red, white, and blue activities afterwards.